Tutorial 1: Hello World!
Introduction
This tutorial will walk you step-by-step through a simple example of how to use screen-scraper.
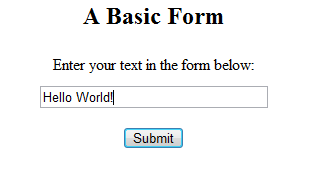
We'll be extracting the words "Hello World" from a web page and writing them to a file. This is a common practice for such things as extracting stock quotes or product prices.
Take a peek at the final product by downloading and importing the scraping session below. If you want to learn how to use screen-scraper be sure to also follow through the tutorials.
| Download complete scraping session | Size |
|---|---|
| Hello World (Scraping Session).sss | 2.27 KB |
1: Proxy Server Setup
What is a Proxy Server?
A proxy server sits between a web browser and a web server, recording and passing information between each. Once configured, every time you click a link or submit a form your browser is sending a request to a target server. These requests are recorded by screen-scraper then relayed to the target web server. The web server will then send corresponding responses back. screen-scraper records these responses and passes them to your browser.

Proxy transactions
All requests and responses are referred to as Transactions. A single click can generate many different transactions. Only some of these transactions are actually useful. You will be learning how to take individual transactions and convert them into Scrapeable Files for use during your scraping session.
Start screen-scraper
To begin you will first need to open up screen-scraper:
On Unix/Linux or Mac OS X use the screen-scraper link that was created when you installed screen-scraper.
If you're running Windows, this is done by selecting the appropriate link from the Start menu.
Once screen-scraper has loaded you'll see the objects tree on the left (it likely only contains the Root Folder currently). Let's create our first object.
Creating a Proxy Session
A proxy session is a screen-scraper object that allows you to interact with the proxy server and its records. You'll generally use one each time you create a new scrape.
Create a proxy session now by clicking the (Add a new proxy session) icon.
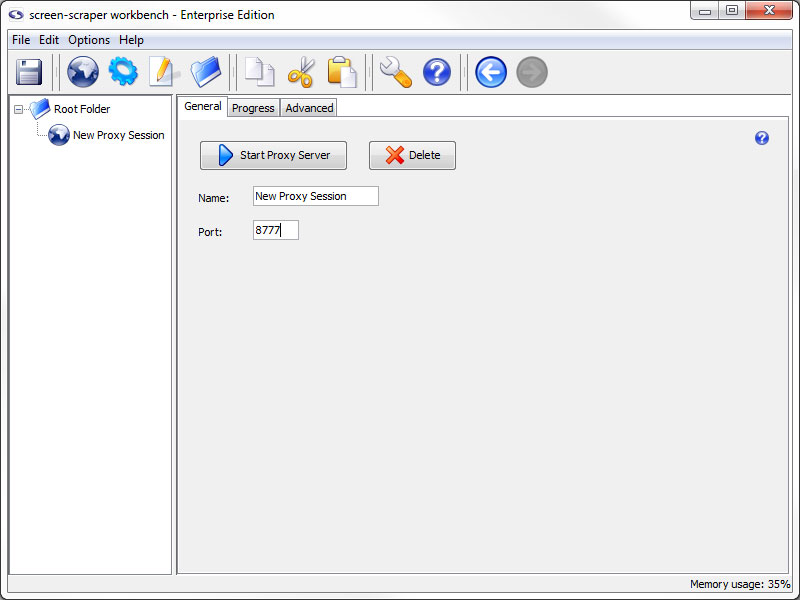
Configuring the Proxy Session
Give the proxy session the name Hello World. Leave the port at 8777.
Configure Browser to Use Proxy Session
If you have multiple web browsers installed on your computer we recommend using one of them to continue through the tutorial and the other to interact with the proxy server. For example, if you have Internet Explorer and Firefox installed you may want to view the tutorial pages using Firefox and use Internet Explorer with the proxy server.
Choose your browser:
Once configured your browser will send all requests through screen-scraper's proxy. This means all links you click or any forms you submit will be sent first to screen-scraper's proxy where it will be recorded. The proxy will then relay your request to the target server.
When the server responds to your request each response will first arrive at screen-scraper's proxy where it will be recorded. The proxy then sends the response to your browser.
If you're running Mac OS X, and are using screen-scraper Professional or Enterprise Edition, there's one more step you'll need to take: In screen-scraper, click the (settings) icon to bring up the Servers button in the panel on the left, then remove any text contained in the Hosts to allow to connect text box. Because of the way Mac OS X handles IP addresses, we do this so that screen-scraper will accept connections from your web browser.
Starting the Proxy Server
Click the Start Proxy Server button in your proxy session. Then, click on the Progress tab.
You're now ready to have screen-scraper record a few pages for you.
2: Proxy Server Record
Record HTTP Transaction
Return now to your web browser (the proxy server one) and go to the following URL:
http://api.screen-scraper.com/tutorial/basic_form.php
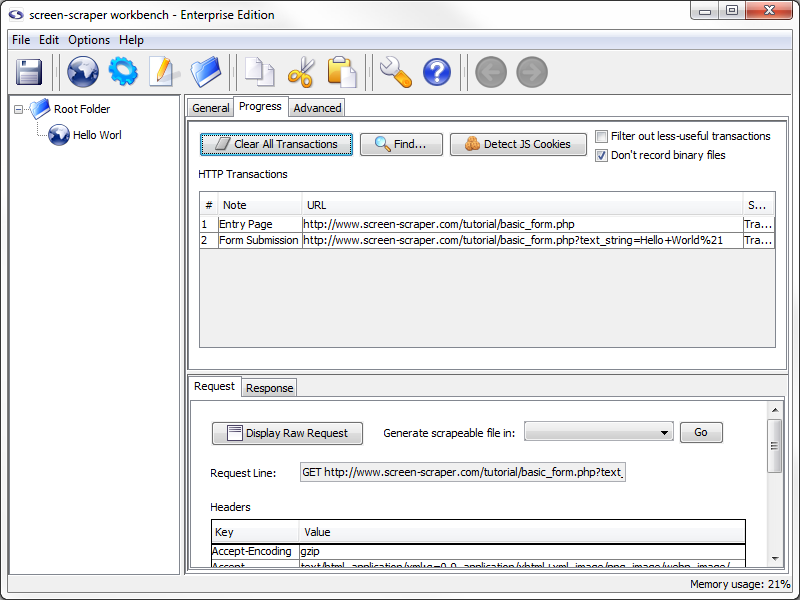
If you take a look at screen-scraper, you'll notice that it recorded this transaction in the HTTP Transactions table.
If you are experiencing issues with transactions being recorded as errors, these can often be the results of browser plug-ins/add-ons. We have found that Internet Explorer is especially prone to them and Opera is most stable/predictable as a browser to use when proxying a site.
If you didn't see your page show up in the HTTP Transactions table, or if your browser seems to have trouble, take a look at this FAQ for help.
Viewing Transaction Information
Clicking on the row in the table will load information related to the browser's request and response in the lower pane.

The lower pane shows the details of the HTTP request your browser made--the request line, any HTTP headers (including cookies), as well as POST data (if any was sent). You can view the corresponding response from the server by clicking on the Response tab.
Don't worry if a lot of what you're seeing doesn't make much sense; for the most part screen-scraper takes care of these kinds of details for you (such as keeping track of cookies).
To help keep track of our transactions let's provide a note for this one. To add a note, double click in the note section of the transaction. Let's add the note Entry Page to this transaction.
A Second Transaction
Returning to your web browser, type Hello world! into the text box and click the submit button. This will submit the form using the GET method, and display what you typed in on the page.
Add the note Form Submission to this transaction.
Stopping the Proxy Server & Reconfiguring the Browser
We now have all of the pages we need recorded. To turn the proxy server off, return to screen-scraper and click on the general tab. Click the Stop Proxy Server button.
You might want to also adjust your web browser so that it no longer uses screen-scraper as a proxy server.
3: Generate Scrapeable File
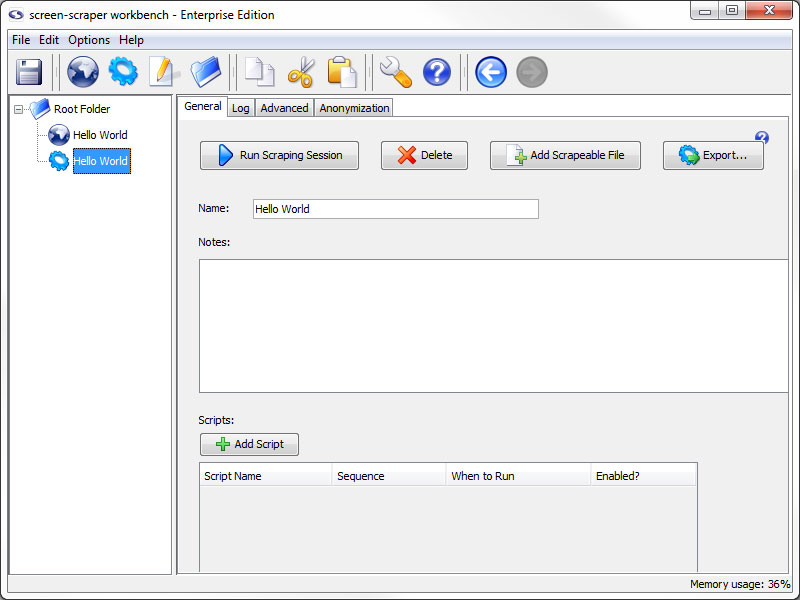
Creating the Scraping Session
To this point we have gathered information on how the pages we will be scraping work. Now we're ready to start creating the scrape. For all scrapes, we start by creating a scraping session. A scraping session is simply a container for all of the files and other objects that will allow us to extract data from a given web site.
Click the (Add a new scraping session) button to create a scraping session.
Rename scraping session to Hello World.
If you imported the scraping session at the beginning of the tutorial you'll want to name it something else, perhaps My Hello World.
Generating Scrapeable Files from Proxy Transactions
Now return to our Hello World proxy session by clicking on Hello World in the objects tree on the left. Click on the Progress tab to view our HTTP transactions from earlier.
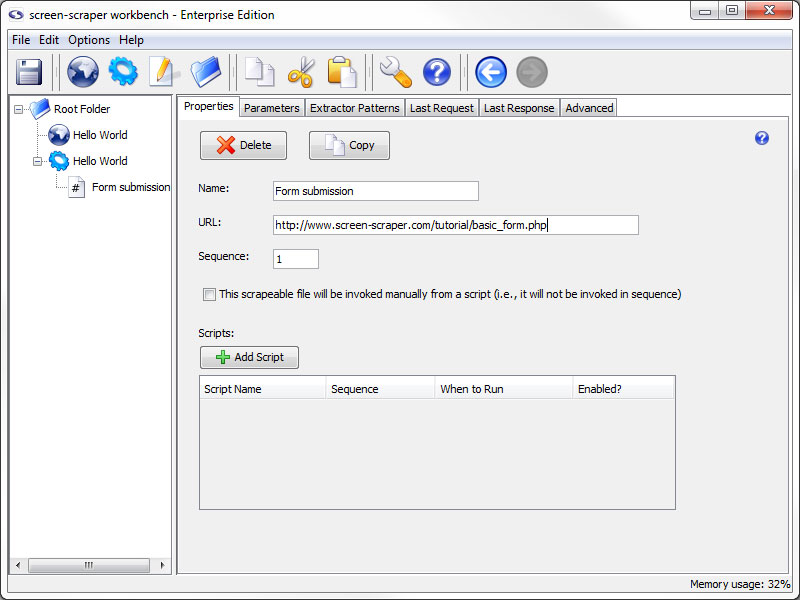
Any of the transactions in the table can be made into scrapeable files in our scrape. In this case, we are interested in the Form Submission transaction. Click on it so that its information loads in the Request tab below.
To create a scrapeable file from this transaction you just need to select the scraping session that you want the file to be created in. In the Generate scrapeable file in drop-down, select Hello World then click the Go button.
The new scrapeable file contains all the information in the HTTP transaction.
Review Recorded Data
Take a quick look at what the Proxy Server recorded. Let's go quickly through each of the tabs.
- Properties: Contains the base URL that was recorded.
- Parameters: Contains the data passed by our form submission.
- Extractor Patterns: Empty for now but here we will build our extractor patterns.
- Last Request: Contains the raw text of the request we made to the server.
- Last Response: Contains the raw text of the response made by the server.
Test Run
To start the scrape, click on the Hello World scraping session in the objects tree, then click the Run Scraping Session button.
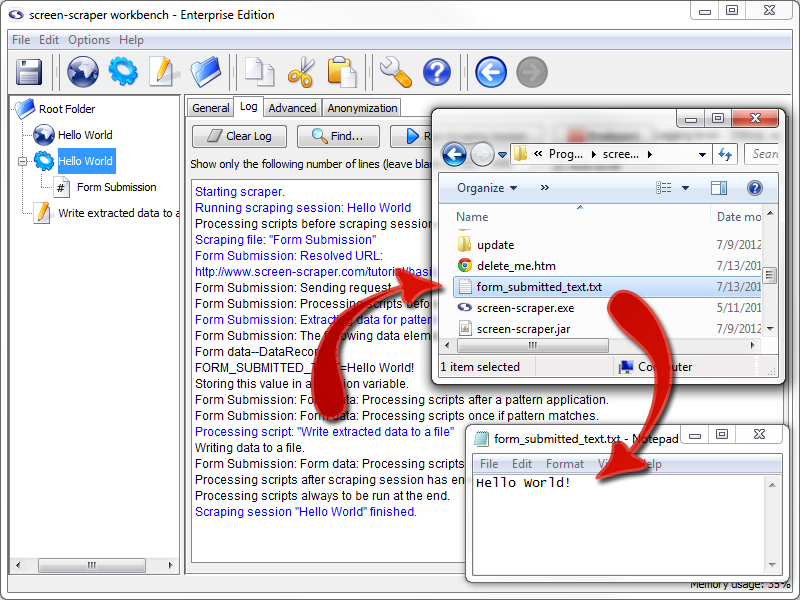
The log should look something like this.
Running scraping session: Hello World
Processing scripts before scraping session begins.
Scraping file: "Form submission"
Form submission: Resolved URL: http://www.screen-scraper.com/tutorial/basic_form.php?text_string=Hello+world%21
Form submission: Sending request.
Processing scripts after scraping session has ended.
Scraping session "Hello World" finished.
Viewing the Scrapeable File Response
You can view the text of the file that was scraped by clicking on the Form submission scrapeable file in the objects tree, then on the Last Response tab. This will show the whole of the HTTP response that the server sent back to screen-scraper.
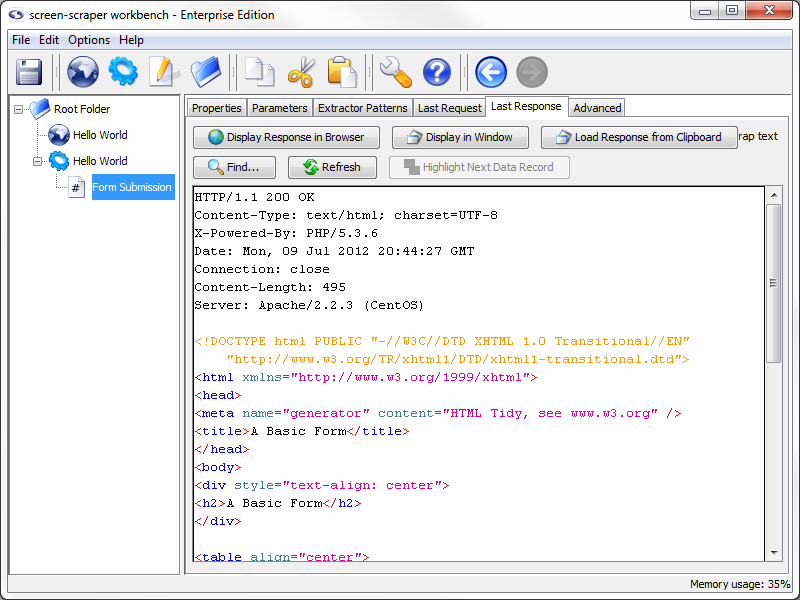
You can view what the page looks like when it is rendered by clicking the Display Response in Browser button. It's often helpful to view the last response for a scrapeable file after running a scraping session so that you can ensure that screen-scraper requested the right page.
A good principle of software design is to run code often as you make changes. Likewise, with screen-scraper it is a good idea to run your scraping session frequently and watch the log and last responses to ensure that things are working as you intend them to.
Saving Your Scrapes
Now would be a good time to save your work. Click the (Save) icon.
4: Create Extractor Pattern
This is probably the trickiest part of the tutorial, so if you've been skimming up to this point you'll probably want to read this page a little more carefully. Here we are going to discuss extractor patterns.
What is an Extractor Pattern?
An extractor pattern is a block of text (usually HTML) that contains special tokens that will match the pieces of data you're interested in gathering. These tokens are text labels surrounded by the delimiters ~@ and @~.
You can think of an extractor pattern like a stencil. A stencil is an image in cut-out form, often made of thin cardboard. To use a stencil you place it over a piece of paper, apply paint, then remove the stencil. The effect is the paint only remains where there were holes in the stencil. Analogously, you can think of placing an extractor pattern over the HTML of a web page. The tokens correspond to the holes where the paint would pass through. After an extractor pattern is applied it reveals only the portions of the web page where tokens were added.

Creating an Extractor Pattern (conceptually)
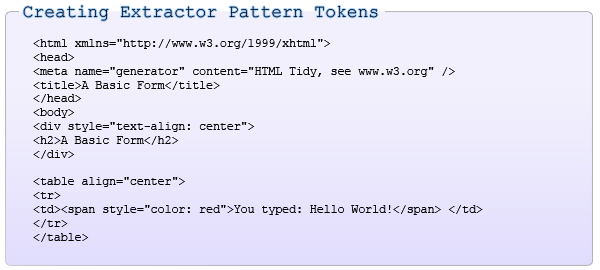
Let's consider this snippet of HTML that was taken from the page:
As we're interested in extracting the string "Hello world!" our extractor pattern would look like this:
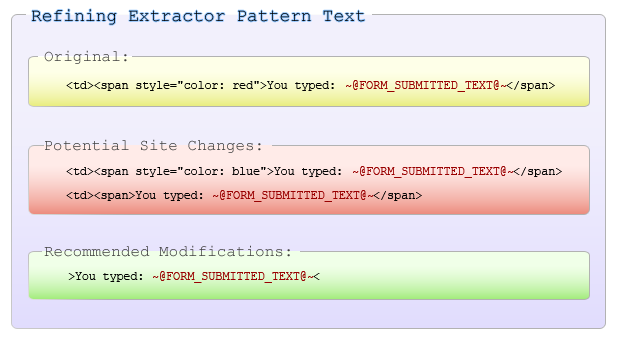
We have added an extractor token with the name FORM_SUBMITTED_TEXT. In this form the pattern is very exact and so prone to breaking if the page were to experience a minor change like adding another attribute to the span tag, changing the style attribute to a class assignment, or changing the tag that is used. To avoid these simple problems we will simplify our pattern.
As you can guess this does not make the pattern unbreakable, just more resilient. If the label before the submitted text was changed it would no longer match and if the pattern added something after the submitted text (but within the same tag) then the token would match too much. That said, we have made it as stable as we can while making sure that it only matches what we want.
Creating an Extractor Pattern
You can have as many extractor patterns as you'd like in a given scrapeable file. screen-scraper will invoke each of them in sequence after requesting the scrapeable file.
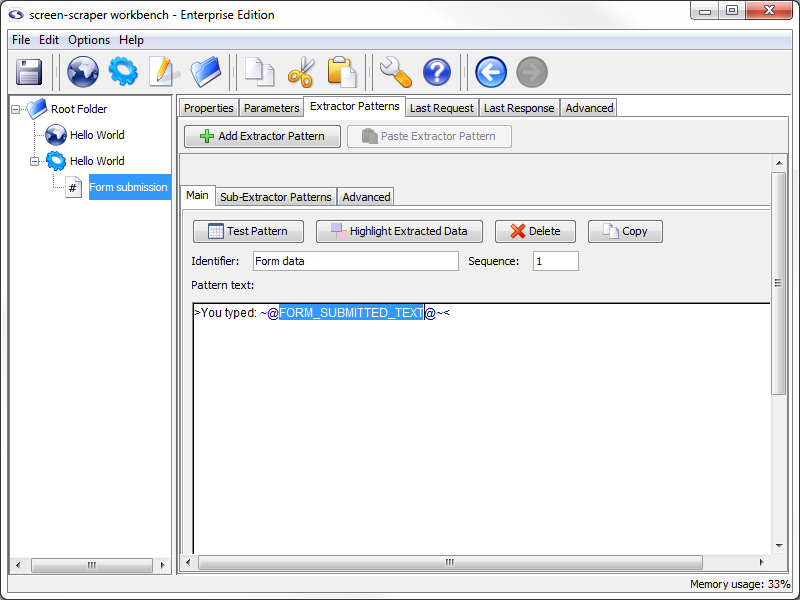
The last response tab can be used to create extractor patterns using the HTML of the page. To view the HTML of the page, click on the Form submission scrapeable file, then on the Last Response tab. Now select the portion of the HTML that we want to use to create the extractor pattern:
If you are having trouble finding it you can use the Find button.
With the text selected, right click and select Generate extractor pattern from selected text from the menu that shows up. This will transition you to the Extractor Patterns tab of the scrapeable file and place the selected text in the Pattern text field.
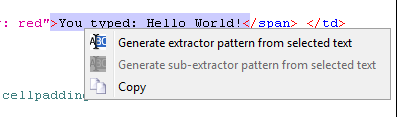
Now highlight the text that you want to be a token:
With the text selected, right click and select Generate extractor pattern token from selected text.

In the window that opens type FORM_SUBMITTED_TEXT in the Identifier textbox and close the window by clicking on the X in the upper right-hand corner. Don't worry settings are saved when the window closes.
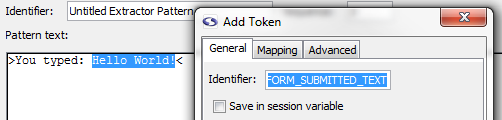
You will notice that screen-scraper has automatically added the delimiters (~@ and @~) to the extractor token.

Give your extractor pattern the identifier
When creating an extractor pattern it is always preferable to use the text in the Last Response tab. When the page gets too long the text will be truncated. This will require you to view to the page source instead, this introduces possible issues. Be careful creating extractor patterns from the browser source as this will not be the exact form that screen-scraper will be using. Test the pattern early and often.

Testing the Extractor Pattern
Go ahead and give the extractor pattern a try by clicking on the Test Pattern button. This will open a window displaying the text that the extractor pattern extracted from the page.

Looks like our extractor pattern has matched the snippet of text we were after. The Test Pattern is another invaluable tool you'll use often to make sure you're getting the right data. It simply uses the HTML from the Last Response tab, and applies the extractor pattern to it.
When creating extractor patterns, always be sure you use the HTML from screen-scraper's Last Response tab, and not the HTML source in your web browser. Before screen-scraper applies an extractor pattern to an HTML page, it tidies up the HTML to facilitate extraction. This will generally cause the HTML to be slightly different from the HTML you'd get directly from your web browser.
Save Extractor Token values to Session Variable
Click the Save in session variable checkbox to store the extracted value ("Hello World!") represented by the FORM_SUBMITTED_TEXT Extractor Pattern Token.
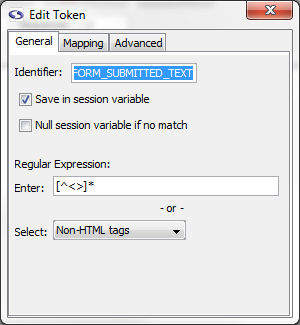
Close the Edit Token window. Now when screen-scraper runs this scraping session and extracts the text for this extractor pattern it will save the text (e.g., "Hello world!") in a session variable so that we can do something with it later. Let's do something with it.
5: Add Script
How Scripts Work in screen-scraper
A screen-scraper script is a block of code that will get executed when a certain event occurs. For example, you might have a script that gets invoked at the beginning of a scraping session that initializes variables. Another script might get invoked each time a row in a list of search results is extracted from a site so that the information in that search result can be inserted into a database.
You can think of this as being analogous to event handling mechanisms in other programming languages. For example, in an HTML page you might associate a JavaScript method call with the onLoad event for the body tag. In Visual Basic you'll often create a sub-routine that gets invoked when a button is clicked. In the same way, screen-scraper scripts will get invoked when certain events occur related to requesting web pages and extracting data from them.
If you don't have much experience programming don't worry, generally scripts written in screen-scraper are short and simple. The script we'll be creating will simply write out the text we extract to a file.
Creating a Script
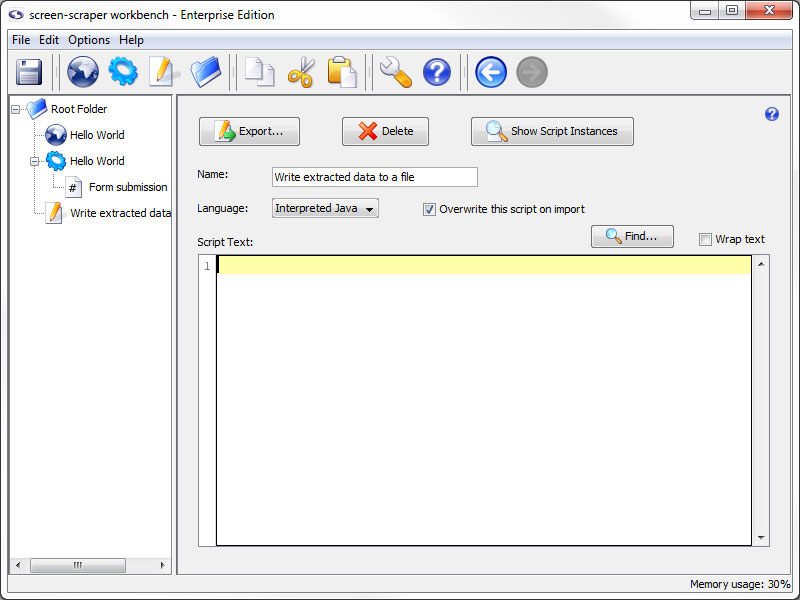
To create a new script, click on the (Add a new script) button. Give it the identifier Write extracted data to a file.
screen-scraper supports scripting in Interpreted Java, JavaScript, and Python when running on any operating system, and JScript, Perl, and VBScript when running on Windows (though these are turned off by default, see AllowUnstableWindowsFeatures documentation in screen-scraper settings). We will be using Java in this tutorial. Let's write our script.
6: Write Script
Using Interpreted Java
screen-scraper uses the BeanShell library to allow for scripting in Java. If you've done some programming in C or JavaScript you'll probably find BeanShell's syntax familiar.
Writing a Script
Let's get right to it. As the purpose of this tutorial is to get you familiar with screen-scraper and not to teach you Java, we will provide you with the code that you need for the script. Copy and paste the following text into the box labeled Script Text:
session.log( "Writing data to a file." ); // Tip: You can also use log.debug( message )
// Create a FileWriter object that we'll use to write out the text.
out = new FileWriter( "form_submitted_text.txt" );
// Write out the text.
out.write( session.getVariable( "FORM_SUBMITTED_TEXT" ) );
// Close the file.
out.close();
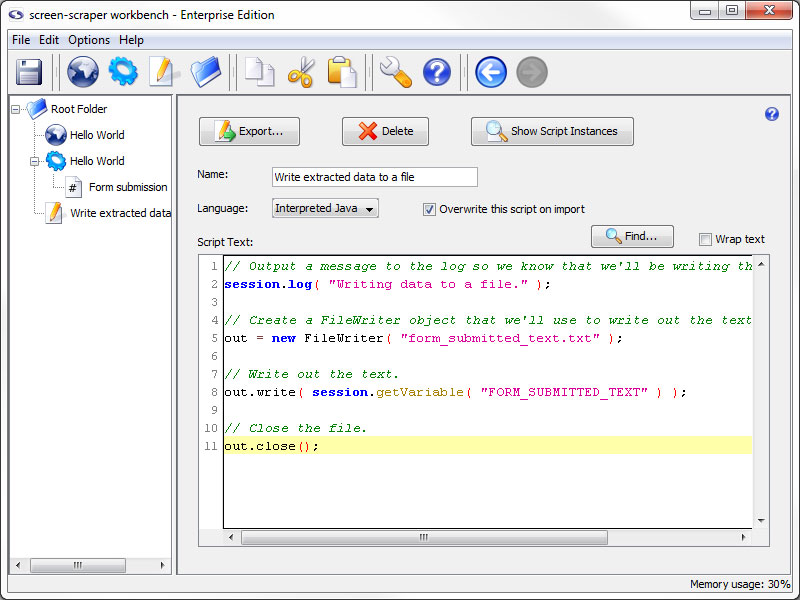
Hopefully it's obvious what's going on, based on the comments in the script. We simply create an object used to write out the text (a FileWriter), write out to it, then close up the file.
The file will be created in the installation directory of screen-scraper.
The session.getVariable( "FORM_SUBMITTED_TEXT" ) method call retrieves the value of the FORM_SUBMITTED_TEXT session variable. This method call is able to get the value because we indicated earlier that the value for the FORM_SUBMITTED_TEXT extractor token was to be saved in a session variable (i.e., when we checked the Save in session variable checkbox).
If you haven't done much programming, this is where things might seem a little confusing. If so, you may consider trying a basic tutorial on Java or JavaScript, which will hopefully introduce you to the basics of programming. You'll especially want to get an introduction to object-oriented programming.
7: Invoke Script
Adding Script Association/Trigger
A script is executed in screen-scraper by associating it with some event, such as before or after an extractor pattern is applied to the text of a web page. The script we've just written needs to be executed after screen-scraper has requested the web page and extracted the data we need from it.
Return to the extractor pattern we just created by clicking on the Form submission scrapeable file, then on the Extractor Patterns tab. In the lower section of your extractor pattern, click on the Add Script button.
Tell screen-scraper when to run the script by selecting Once if pattern matches.
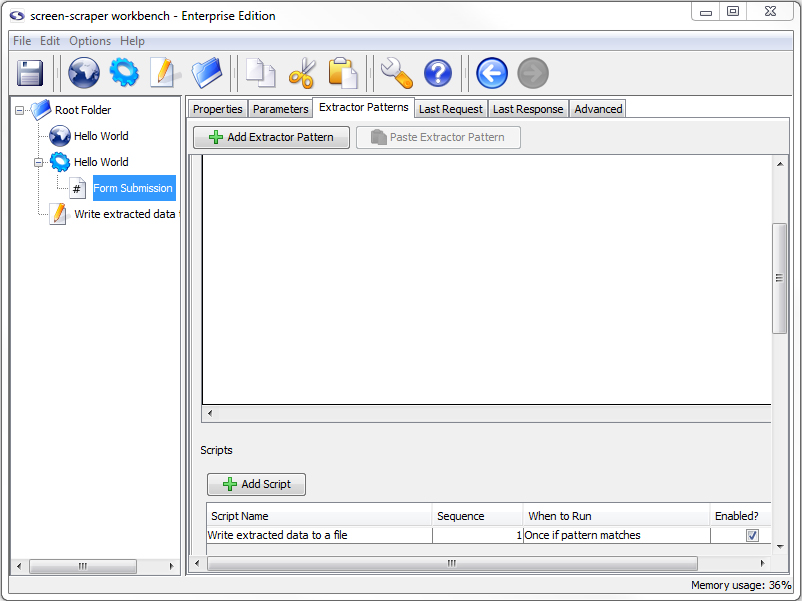
Our Write extracted data to a file script will be invoked after the first match is found to the Form data extractor pattern.
8: Run Scraping Session
Final Run
Now we have everything in place for our scrape. It knows what files to scrape, what data to extract, and what to do with the extracted data. Now it is time to make sure that it is working.
Just like with the test run, click on the Hello World scraping session in the objects tree. First, click on the Log tab. If there is existing text get rid of it by clicking the Clear Log button. Now click on the Run Scraping Session button.
After it finishes running, take a look at the contents of the form_submitted_text.txt file, which will be located in the screen-scraper installation directory (e.g., C:\Program Files\screen-scraper professional edition\). It should contain the text Hello world! in the document.
9: Review
Quick Summary
When learning to do something new it is important to see what you have done, and not just what you still don't know how to do. With that in mind take a moment to review the things that you have accomplished in this tutorial. To help in your reflection we have provided a list of the major steps from the tutorial. If you want to review information from any of the steps, you can click on the link to be returned back to that section of the tutorial.
- Create Proxy Session
- Configure Proxy Session
- Configure Browser to Use Proxy Session
- Run Proxy Server
- Record HTTP Transactions Using Proxy Session
- Create Scraping Session
- Generate Scrapeable Files from Proxy Transactions
- Create Extractor Pattern
- Save Extractor Token values to Session Variable
- Create Script
- Write Script
- Add Script Association
- Run Scrape
10: Where to Go From Here
Suggestions
First off, Congratulations! You now have the basic core knowledge you need to scrape screens with screen-scraper. While this was a very simple example of a scraping session, we covered most of the main principles you need to start your own project.
More Training/Tutorials
If you have the time, we'd highly recommend continuing on to Tutorial 2: Scraping an E-commerce Site. Don't worry, it just one step up. In it we will look at iterating through pages as well as logging in to a site. You could also go through Tutorial 3: Extending Hello World, in which you will learn how to interact with screen-scraper using external scripts like ASP, Java, and PHP (requires that you have a server on which to run the scripts).
Otherwise, you may want to consider reading through some of the existing documentation as you work on your own project.
Still a Little Lost?
If you don't feel comfortable with the process, we invite you to recreate the scrape using the tutorial only for reference. This can be done using only the screen-shots or review outline while you work on it. If you are still struggling you can search our forums for others like yourself and ask specific questions to the screen-scraper community.