Tutorial 3: Extending Hello World
Overview
This tutorial continues where Tutorial 1: Hello World left off and covers aspects of interacting with screen-scraper from external languages, like Active Server Pages, PHP, ColdFusion and Java.
Tutorial Requirements
Completed scraping session from Tutorial 1 is available here: Hello World (Scraping Session).sss
Any version of screen-scraper will work with this tutorial; however, in order to interact with screen-scraper using something other than the command line requires either a Professional or Enterprise edition of screen-scraper.
Finished Project
If you'd like to see the final version of the scraping session you'll be creating in this tutorial you can download it below.
| Attachment | Size |
|---|---|
| Hello World (Scraping Session).sss | 3.30 KB |
1: Initialization Script
The Extension
A significant limitation of our first Hello World was that we could only scrape the text from our first request. That is, we were always scraping the text "Hello world!", which really isn't that useful. We'll now adjust our setup so that we can designate the text to be submitted in the form.
Initialization Script
First, we're going to set a session variable that will hold the text we'd like submitted in the form.
Session variables are used by screen-scraper to transfer information between scripts, scrapeable files, and other objects. Session variables are generally set from within scripts, but can also be automatically set within extractor patterns as well as passed in from external applications.
We'll now set up a script to set a session variable before our scraping session runs. Create a new script as you've done before, and call it Initialize scraping session. Copy the code below into the Script Text field in the script:
// session variable so we can reference it later.
session.setVariable( "TEXT_TO_SUBMIT", "Hi everybody!" );
Hopefully the script seems pretty straightforward. It sets a session variable named TEXT_TO_SUBMIT, and gives it the value Hi everybody! (spoken, of course, in your best Dr. Nick voice).
Setting the session variable TEXT_TO_SUBMIT will allow us to access that value in other scripts and scrapeable files while our Hello World scraping session is running.
We will, later in this tutorial, replace this script with a call from our external script. So, it might help to think of this as a debug script. We place it in or code so that we can run it from the workbench, but remove it later so the it doesn't interfere with our external scripts.
Adding Script Association
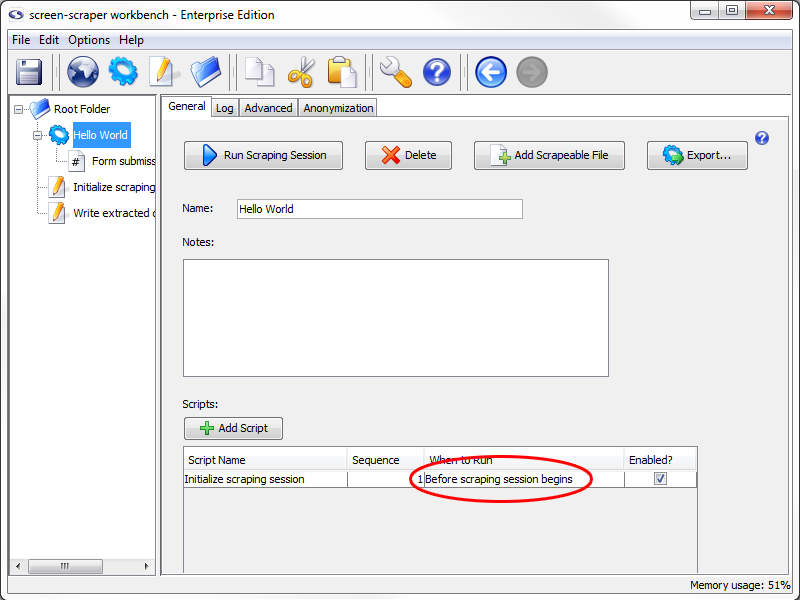
We'll now need to associate our script with our scraping session so that it gets invoked before the scraping session begins.
To do that, click on the Hello World scraping session in the objects tree on the left, then (in the section towards the bottom of the window) click the Add Script button to add the association. In the Script Name column select Initialize scraping session. The When to Run column should show Before scraping session begins, and the Enabled checkbox should be checked. This will cause our script to get executed at the very beginning of the scraping session so that the TEXT_TO_SUBMIT session variable can get set.
Scrapeable File Updates
Just as we use special tokens in extractor patterns to designate values we'd like to extract, we use special tokens to insert values of session variables into the URLs or parameters (GET, POST, or BASIC authentication) of scrapeable files. We'll do this now by embedding it into one of the parameters of our only scrapeable file. Expand the Hello World scraping session in the objects tree, then select the Form submission scrapeable file. Click on the Parameters tab. In the Value column for our text_string parameter replace the text Hello world! with the text ~#TEXT_TO_SUBMIT#~
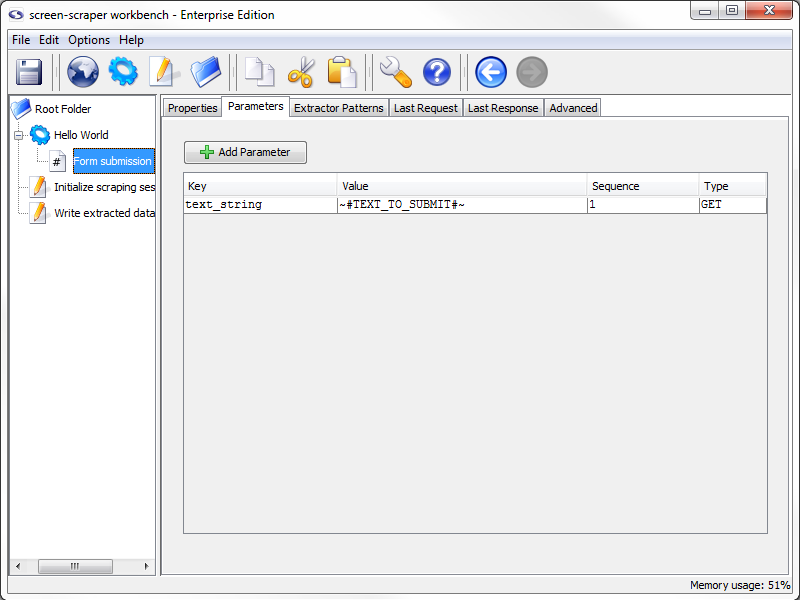
The ~# and #~ delimiters are used to designate a session variable whose value should be inserted into that location when the scrapeable file gets executed. When the scrapeable file gets invoked, screen-scraper will construct the URL by including the text_string parameter in it. In other words, the URL for our scrapeable file will become:
Test Run
We're going to run our scraping session, but before doing that clear out the scraping session log by selecting the Hello World scraping session in the objects tree, clicking on the Log tab, then on the Clear Log button. Start up the scraping session by clicking the Run Scraping Session button. Once the scrape has run, you should get the log similar to the one in figure below.
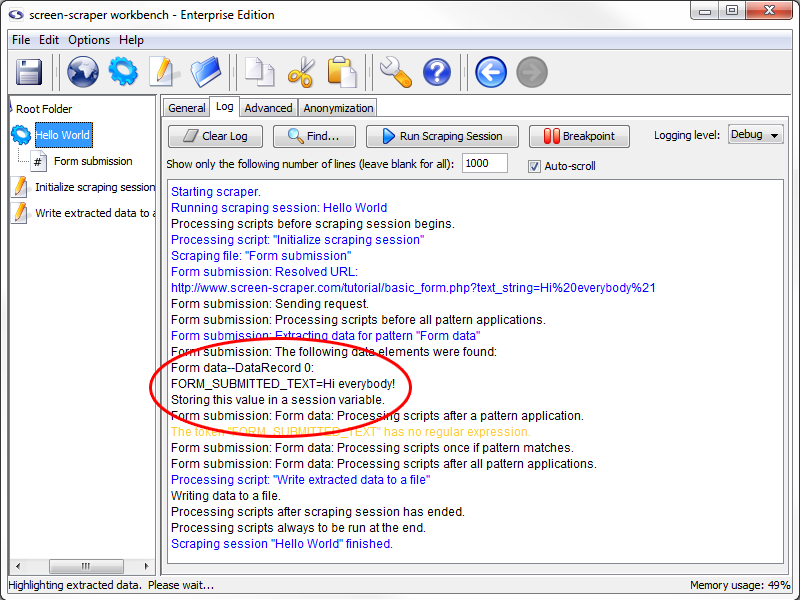
If you look at the contents of the form_submitted_text.txt file (in the screen-scraper installation directory) you'll notice the text Hi everybody!. If you still have the file from before you might need to look for the new text.
Remember that it's a good idea to run scraping sessions often as you make changes, and watch the log and last responses to ensure that things are working as you expect them to.
2: Scrape Updates
Preparing the Scraping Session
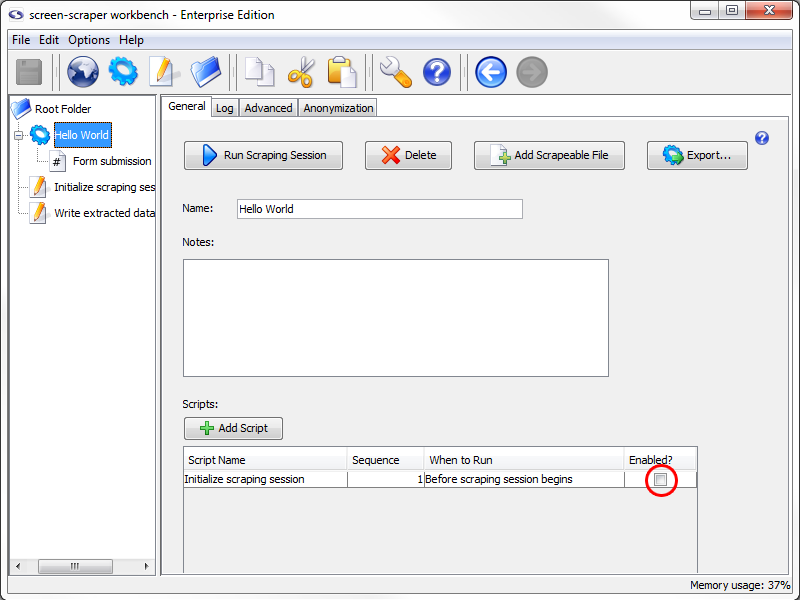
Within screen-scraper, you'll want to disable the Initialize scraping session script; otherwise, the value we pass in will get overwritten when the script is executed.
Disable the script by clicking on the Hello World scraping session, then on the General tab, then un-check the Enabled check box for the script.
Logging
Each time you run a scraping session externally screen-scraper will generate a log file corresponding to that scraping session in the log folder found inside the directory where you installed screen-scraper. This can be invaluable for debugging, so you'll want to take a look at it if you run into trouble.
You can turn server logging off by unchecking the Generate log files check box under the Servers section of the settings dialog box.
3: External Application
Invoking screen-scraper Externally
If you've decided to use the basic edition of screen-scraper your only option for invoking screen-scraper externally is to use the command line (invoking screen-scraper from the command line is also available in the Professional and Enterprise Editions). If you are using a Professional or Enterprise edition of screen-scraper and have access to a server that supports ASP, PHP, ColdFusion, or Java you can continue the tutorial by selecting which language you desire to use at the bottom of the page.
The rest of this page is particular to completing the tutorial using a server language. If you are using a Basic Edition of screen-scraper you are welcome to read on but you will not be able to complete the tasks.
Oftentimes you'll want to use a language or platform external to screen-scraper to scrape data. screen-scraper can be controlled externally using Java, PHP, Ruby, Python, .NET, ColdFusion, any COM-friendly language (such as Active Server Pages or Visual Basic), or any language that supports SOAP. In this next part of the tutorial we'll give examples in PHP, Java, ColdFusion, and Active Server Pages.
Running the screen-scraper Server
In order to interact with screen-scraper externally it needs to be running as a server. When running as a server screen-scraper acts much like a database server does. That is, it listens for requests from external sources, services those requests, and sends back responses. For example, when you issue a SQL statement to a database from an ASP script your script opens up a socket to the database, sends the request over it, then receives the database's response back over the socket. Once this transaction has been completed the socket will be closed, but the database will continue to listen for other requests. screen-scraper works in a similar way.
At this point we'd recommend reading over the documentation page that discusses running screen-scraper as a server, and gives details on how to start and stop it according to the platform you're running on. Follow the link below, then return back to this page when you're finished:
Before we start writing code to interact with screen-scraper externally we need to configure a few things. Depending on the language you'd like to program in, please follow one of the links below, which will give you an overview of interacting with screen-scraper using that language and guide you through any configuration that needs to take place. Once you're finished return back to this page.
3.1: Using ASP
Create the Script
The ASP script we'll be using will invoke our scraping session remotely, passing in a value for the TEXT_TO_SUBMIT session variable. Create a new ASP script on your computer, and paste the following code into it:
' Create a RemoteScrapingSession object.
Set objRemoteSession = Server.CreateObject("Screenscraper.RemoteScrapingSession")
' Generate a new "Hello World" scraping session.
Call objRemoteSession.Initialize("Hello World")
' Put the text to be submitted in the form into a session variable so we can reference it later.
Call objRemoteSession.SetVariable( "TEXT_TO_SUBMIT", "Hi everybody!" )
' Check for errors.
If objRemoteSession.isError Then
Response.Write( "Error: " & objRemoteSession.GetErrorMessage )
Else
' Tell the scraping session to scrape.
Call objRemoteSession.Scrape
' Write out the text that was scraped:
Response.Write( "Scraped text: " + objRemoteSession.GetVariable("FORM_SUBMITTED_TEXT") )
End If
' Disconnect from the server.
Call objRemoteSession.Disconnect
%>
Script Description
After creating our RemoteScrapingSession object we make a separate call to initialize it. This is required for ASP. Also, you'll notice that before calling the Scrape method we check for any errors that may have occurred up to this point.
If for some reason your ASP script can't connect to the server you'd want to know before you tried to tell it to scrape.
Finally, the script explicitly disconnects from the server so that it knows we're done.
Running the Script
OK, we're ready to give our script a try. Make sure that screen-scraper running in server mode. If you've succeeded in starting up the server go ahead and load your ASP script in a browser. After a short pause you should see Scraped text: Hi everybody! output to your browser.
If there was an error then a message indicating the problem that occurred will be displayed.
3.1: Using ColdFusion
Create the Scripts
We'll be creating two different scripts to interact with screen-scraper via ColdFusion. The first will be using ColdFusion tags, and the second will be using ColdFusion script. Each of these scripts will invoke our scraping session remotely and pass in a value for the TEXT_TO_SUBMIT session variable.
If you have not already configured ColdFusion to run with screen-scraper, now is a good time to setup ColdFusion.
Tags Method
Create a new ColdFusion script on your computer, and paste the following code into it:
<head>
<title>ColdFusion Tag Example</title>
</head>
<body>
<cfobject
action = "create"
type = "java"
class = "com.screenscraper.scraper.RemoteScrapingSession"
name = "RemoteScrapingSession">
<cfset remoteSession = RemoteScrapingSession.init("Hello World","localhost",8778)>
<cfset remoteSession.setVariable( "TEXT_TO_SUBMIT", "Hi everybody!" )>
<cfset remoteSession.scrape()>
<cfset test = remoteSession.getVariable("FORM_SUBMITTED_TEXT")>
<cfset remoteSession.disconnect()>
<cfoutput>
textReturned: #test#
</cfoutput>
</body>
</html>
Script Method
If you prefer using ColdFusion script to program, you can use the following code instead of the code we give above:
<head>
<title>ColdFusion Script Example</title>
</head>
<body>
<cfscript>
RemoteScrapingSession = CreateObject("java","com.screenscraper.scraper.RemoteScrapingSession");
remoteSession = RemoteScrapingSession.init("Hello World","localhost",8778);
remoteSession.setVariable( "TEXT_TO_SUBMIT", "Hi everybody!" );
remoteSession.scrape();
test = remoteSession.getVariable( "FORM_SUBMITTED_TEXT" );
remoteSession.disconnect();
</cfscript>
<cfoutput>
textReturned: #test#
</cfoutput>
</body>
</html>
Script Description
You can probably follow the logic but for clarity let's take a moment to look at it. This script creates a RemoteScrapingSession, initializes it to be connected to the Hello World scraping session, sets the TEXT_TO_SUBMIT session variable, then scrapes the page and explicitly disconnects.
Running the Script
OK, we're ready to give our ColdFusion script a try. Start screen-scraper running in server mode. If you've succeeded in starting up the server go ahead and access your ColdFusion script from your browser. After a short pause you should see textReturned: Hi everybody! appear.
3.1: Using Java
Create the Script
The Java class we'll be writing will simply substitute for the Initialize scraping session script we wrote previously. That is, our Java class will invoke our scraping session remotely and pass in a value for the TEXT_TO_SUBMIT session variable. Create a new Java class on your computer, and paste the following code into it:
public class HelloWorldRemoteScrapingSession
{
/**
* The entry point.
*/
public static void main( String args[] )
{
try
{
// Create a remoteSession to communicate with the server.
RemoteScrapingSession remoteSession = new RemoteScrapingSession( "Hello World" );
// Put the text to be submitted in the form into a session variable so we can reference it later.
remoteSession.setVariable( "TEXT_TO_SUBMIT", "Hi everybody!" );
// Tell the session to scrape.
remoteSession.scrape();
// Output the text that was scraped:
System.out.println( "Scraped text: " + remoteSession.getVariable( "FORM_SUBMITTED_TEXT" ) );
// Very important! Be sure to disconnect from the server.
remoteSession.disconnect();
}
catch( Exception e )
{
System.err.println( e.getMessage() );
}
}
}
Script Explanation
For the most part this Java code is virtually identical to our script. The one notable difference is that we need to explicitly disconnect from the server so that it knows we're done.
Running the Script
OK, we're ready to give our Java class a try. After you've successfully compiled the class (remember to include the "screen-scraper.jar" file in your classpath), start screen-scraper running as a server. If you've succeeded in starting up the server go ahead and run the Java class from a command prompt or console. After a short pause you should see the "Hi everybody!" message output.
3.1: Using PHP
Create the Script
The PHP script we'll be writing will invoke our scraping session remotely, passing in a value for the TEXT_TO_SUBMIT session variable. Create a new PHP script on your computer, and paste the following code into it:
/**
* Note that in order to run this script the file
* remote_scraping_session.php must be in the same
* directory.
*/
require('remote_scraping_session.php');
// Instantiate a remote scraping session.
$session = new RemoteScrapingSession;
// Initialize the "Hello World" session.
echo "Initializing the session.<br />";
flush();
$session->initialize("Hello World");
// Put the text to be submitted in the form into a session variable so we can reference it later.
$session->setVariable("TEXT_TO_SUBMIT", "Hi everybody!" );
// Check for errors.
if($session->isError() )
{
echo "An error occurred: " . $session->getErrorMessage() . "<br />";
exit();
}
// Tell the session to scrape.
echo "Scraping <br />";
flush();
$session->scrape();
// Write out the text that was scraped:<
echo "Scraped text: " . $session->getVariable("FORM_SUBMITTED_TEXT") . "<br />";
// Very important! Be sure to disconnect from the server.
$session->disconnect();
// Indicate that we're finished.
echo "Finished.";
?>
Script Description
After creating our RemoteScrapingSession object we make a separate call to initialize it for our specific scraping session. After calling the Scrape method we check for any errors that may have occurred up to this point.
If for some reason your PHP script can't connect to the server you'd want to know before you tried to tell it to scrape.
Finally, we explicitly disconnect from the server so that it knows we're done.
OK, we're ready to give our script a try. Start screen-scraper running as a server.
Make sure that the remote_scraping_session.php file has been copied to the same directory as your PHP script (the file can be found in screen-scraper's installation directory, misc/php.
If you've succeeded in starting up the server go ahead and load your PHP script in a browser. After a short pause you should see the following in the browser output:
Scraping
Scraped text: Hi+everybody%21
Finished.
3.1: Using the Command Line
Overview
If you've decided to use the basic edition of screen-scraper this is your only option for invoking screen-scraper externally (invoking screen-scraper from the command line is also available in the professional and enterprise editions).
You can find full documentation and examples on using the command line on our Invoking screen-scraper from the command line documentation.
Writing the External Script
In order to invoke screen-scraper from the command line, you'll need to create a batch file (in Windows) or a shell script (in Linux or Mac OS X) to invoke the scraping session.
If you have not disabled the Initialize scraping session script then please do so now. Instructions on how to do this can be found on the previous page.
Windows
If you're using Windows open a text editor (e.g., Notepad) and enter the following:
Save the batch file (call it hello_world.bat) in the folder where screen-scraper is installed (e.g., C:\Program Files\screen-scraper professional edition\).
If the version of screen-scraper you're running is prior to 4.5, and you're running Windows Vista, you will need to save your batch file to a location such as your Documents folder or your Desktop. Then, within Windows Explorer, manually transfer the file to the directory where screen-scraper is installed.
Linux
If you're running Linux, the shell script would look like this:
Save the shell script (call it hello_world.sh) in the folder where screen-scraper is installed (e.g., /usr/local/screen-scraper professional edition/).
Mac
For Mac OS X, you'd use this for the script:
Save the shell script (call it hello_world.sh) in the folder where screen-scraper is installed (e.g., /Users/username/screen-scraper professional edition/).
Running Script
Windows
Open a DOS prompt. The cmd can be opened by clicking on the Start menu, selecting the Run option (on the right), and typing cmd.
For Windows 7 just type command into the Start menu search then click on cmd.
Navigate to the screen-scraper installation directory using the cd command. It should resemble:
Once you are in the correct directory, run the file by simply typing its name into cmd:
You should see the text from screen-scraper's log appear in the DOS window.
Non-Windows Operating System
If you're running Linux or Mac OS X, you'll need to close the workbench before invoking your shell script.
Open Terminal and navigate to the screen-scraper installation directory using the cd command. One example is shown below:
Once you are in the correct directory, run the file:
Viewing the Results
As with the first tutorial and our test run, to see that the script has run open the form_submitted_text.txt file in the screen-scraper installation directory. You can also try editing the file and running it again to have it say something else. Have some fun!
4: Review
Quick Summary
When learning to do something new it is important to see what you have done, and not just what you still don't know how to do. With that in mind take a moment to review the things that you have accomplished in this tutorial. To help in your reflection we have provided a list of the major steps from the tutorial. If you want to review information from any of the steps, you can click on the link to be returned back to that section of the tutorial.
5: Where to Go From Here
Suggestions
Once again, we want to start by saying Congratulations! You have made it through a tutorial and are progressing in your abilities to extract information from the web. At this point you should have the basics under your belt to scrape most web sites from the workbench and manage those scrapes from an external script.
More Training/Tutorials
From here you could continue on with any other tutorial that seems relevant to your project or curiosities. The remaining all build off of the second tutorial. The differences between them can be summed up as pertaining either to how the scrape is started or how the extracted information is processed. In some cases they will required that you have a Professional or Enterprise edition of screen-scraper.
The fourth tutorial is similar to this tutorial but as the scrape is quite a bit longer the management script is also. It is a great next step if you want to continue learning about managing scrapes from external sources.
At this point you may want to consider reading through some of the existing documentation to get more familiar with the particulars of the product. Whatever you choose, the best way to learn screen-scraper is to use it. Try it on one of your own projects!
Still a Little Lost?
If you don't feel comfortable with the process, we invite you to recreate the scrape using the tutorial only for reference. This can be done using only the screen-shots or review outline while you work on it. If you are still struggling you can search our forums for others like yourself and ask specific questions to the screen-scraper community.