Browser Configuration
Overview
screen-scraper's proxy server is a valuable tool for manipulating server interactions and building scrapes. In order for the proxy server to gather information from a browser, the browser must be configured to make requests to the server. As many people have never done this before we have provided instructions on how to setup some common browsers to use a proxy server. It is a simple process but one that might be a little foreign.
When you are done developing your sessions you will likely want to reset the proxy settings back to their normal state. This is not required so long as the proxy server is still running but once the proxy server is stopped the proxy settings will cause configured browsers to stop working until the settings are reset.
Alternate Proxy
We've also added support to import proxy sessions from Charles proxy. You can proxy using Charles and then export the data to a "JSON Session File" and import that into screen-scraper. This can be a helpful alternative for proxying SSL sites.
Choosing a Proxy Browser
Though any browser can be used to record transactions on the proxy server, we have found that some tend to experience less problems, complications, ans issues compared to others. On that note you might want to take some time to think about what browser you want to use when proxying a site.
If you are experiencing issues with transactions being recorded as errors, these can often be the results of browser plug-ins/add-ons. We have found that Internet Explorer is especially prone to them where as Opera tends to have the fewest issues.
Configure Chrome
Chrome Proxy Settings
Windows users:
- Open Options under the wrench icon
 .
. - Click on Under the Hood link on the left-hand navigation.
- Under Network click on the Change proxy settings... button.
- Click on LAN Settings
- Click on the checkbox beginning with Use a proxy server for...
- Click on the Advanced button.
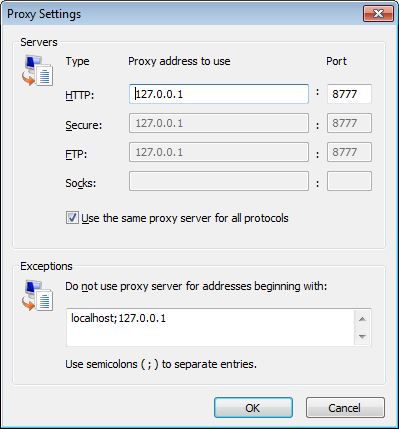
- In the HTTP and Secure fields type localhost under the Proxy address to use column, and 8777 under Port
If you have changed your proxy server settings to use a port other than 8777 then type your selected port in place of 8777.
- Hit the OK button a few times till you get back to your web browser.
If you're using a dial-up connection the setup will differ slightly. Instead of the LAN Settings button you'll want to find your dial-up connection under the Dial-up and Virtual Private Network settings dialog box, then configure it via the Settings button.
Depending on your operating system, instead of localhost you may need to use either 127.0.0.1 or the IP address of the machine. If you have trouble connecting to screen-scraper's proxy with your web browser, please see this FAQ.
Linux users:
- Open Preferences under the wrench icon .
- Click on Under the Hood link on the left-hand navigation.
- Under Network click on the Change proxy settings... button.
-
Under the Proxy Configuration tab select the Manual proxy configuration radio button.
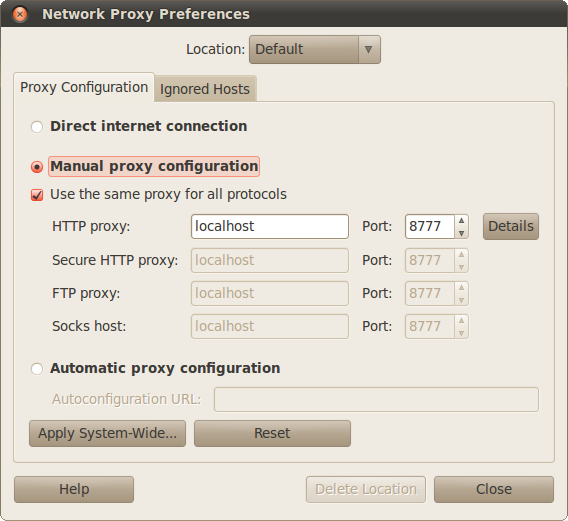
- Check the box next to Use the same proxy for all protocols.
- Enter localhost in the HTTP proxy field.
- Enter 8777 in the Port field.
- Click on the Ignored Hosts tab.
- Enter the following in the Ignore Host List:
- localhost
- 127.0.0.0/8
- *.local
- Click Close
- We recommend selecting Close when prompted Do you want to apply these settings system-wide...
If you're using a dial-up connection the setup will differ slightly. Instead of the LAN Settings button you'll want to find your dial-up connection under the Dial-up and Virtual Private Network settings dialog box, then configure it via the Settings button.
Depending on your operating system, instead of localhost you may need to use either 127.0.0.1 or the IP address of the machine. If you have trouble connecting to screen-scraper's proxy with your web browser, please see this FAQ.
Mac OS X users:
- Open Preferences under the wrench icon .
- Click on Under the Hood link on the left-hand navigation.
- Under Network click on the Change proxy settings... button.
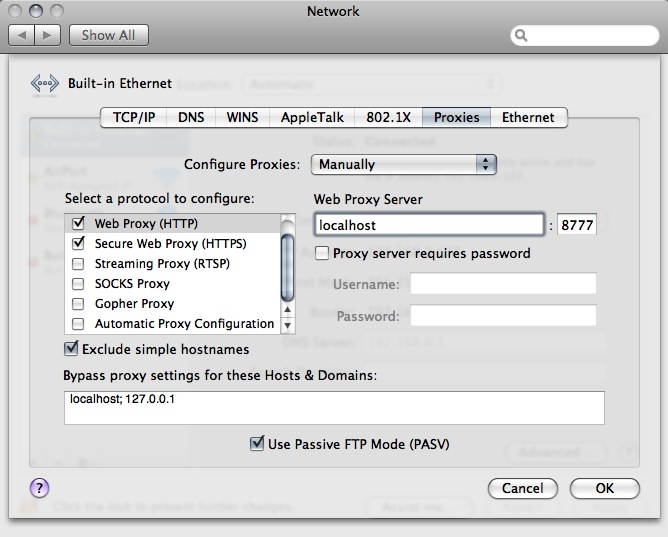
Select "Manually" next to Configure Proxies- Check box next to Web Proxy (HTTP)
- Enter Localhost under Web Proxy Server and 8777 in adjoining port field
- Check box next to Secure Web Proxy (HTTPS)
- Enter Localhost under Web Proxy Server and 8777 in adjoining port field
- Under Bypass proxy settings for these Hosts & Domains enter localhost; 127.0.0.1
If you're using a dial-up connection the setup will differ slightly. Instead of the LAN Settings button you'll want to find your dial-up connection under the Dial-up and Virtual Private Network settings dialog box, then configure it via the Settings button.
Depending on your operating system, instead of localhost you may need to use either 127.0.0.1 or the IP address of the machine. If you have trouble connecting to screen-scraper's proxy with your web browser, please see this FAQ.
Configuring Firefox
Firefox Proxy Settings
- Open Options/Preferences window.
Windows users: click Options from the menu.
Linux users: click Preferences from the menu.
Mac OS X users: click Preferences from the menu.
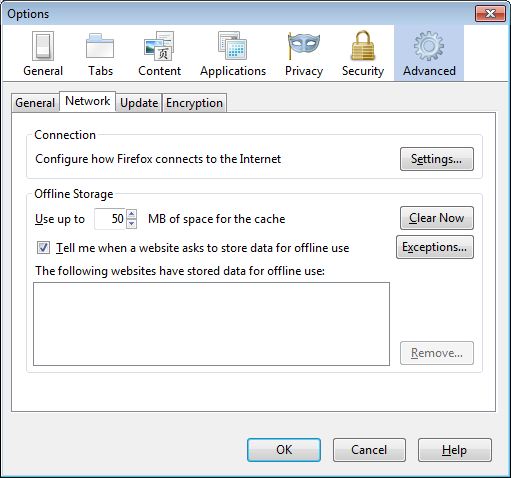
- Click on the Advanced button at the top of the window (if not already selected).
- Click on the Settings... button at the top of the Network tab.
- Click the Manual proxy configuration radio button.
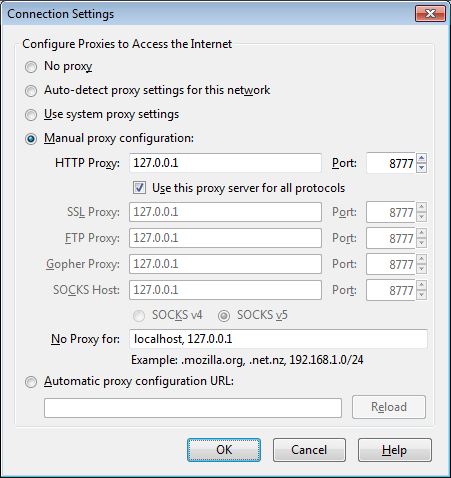
- In the HTTP Proxy field type localhost, and 8777 in Port.
If you have changed your proxy server settings to use a port other than 8777 then type your selected port in place of 8777.
- Click on the Use this proxy server for all protocols check box.
- Hit the OK button to get back to your web browser.
If you're using a dial-up connection the setup will differ slightly. Instead of the LAN Settings button you'll want to find your dial-up connection under the Dial-up and Virtual Private Network settings dialog box, then configure it via the Settings button.
Depending on your operating system, instead of localhost you may need to use either 127.0.0.1 or the IP address of the machine. If you have trouble connecting to screen-scraper's proxy with your web browser, please see this FAQ.
For useful add-ons, visit the Browser Tools page.
Configuring Internet Explorer
Internet Explorer Proxy Settings
- Click Internet Options in the menu.
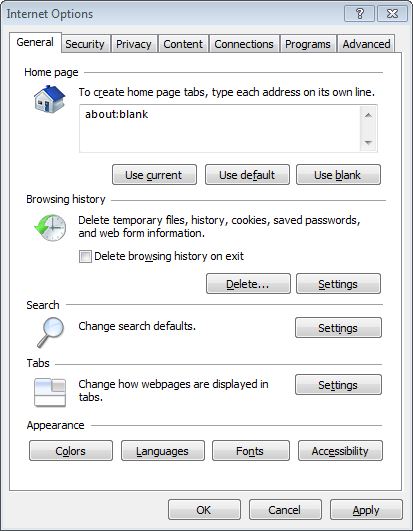
- Go to the Connections tab.
- Click on LAN Settings.
- Click on the checkbox beginning with Use a proxy server for....
- Click on the Advanced... button.
- In the HTTP and Secure fields type localhost under the Proxy address to use column, and 8777 under Port
If you have changed your proxy server settings to use a port other than 8777 then type your selected port in place of 8777.
- Hit the OK button a few times till you get back to your web browser.
If you're using a dial-up connection the setup will differ slightly. Instead of the LAN Settings button you'll want to find your dial-up connection under the Dial-up and Virtual Private Network settings dialog box, then configure it via the Settings button.
Depending on your operating system, instead of localhost you may need to use either 127.0.0.1 or the IP address of the machine. If you have trouble connecting to screen-scraper's proxy with your web browser, please see this FAQ.
Configuring Opera
Opera Proxy Settings
- Click Preferences in the menu.
Windows 7 users will need to select Preferences from the Settings menu after clicking to open Opera's menu.
Mac OS X users will need to select Preferences... from the Opera menu.
- Click on the Advanced tab.
- Click on the Network section listed near the bottom on the left.
- Click on the Proxy Servers... button.

- Enable the first HTTP checkbox, and enter localhost or 127.0.0.1 in the first field and 8777 in the port box.
If you have changed your proxy server settings to use a port other than 8777 then type your selected port in place of 8777.

If you're using a dial-up connection the setup will differ slightly. Instead of the LAN Settings button you'll want to find your dial-up connection under the Dial-up and Virtual Private Network settings dialog box, then configure it via the Settings button.
Depending on your operating system, instead of localhost you may need to use either 127.0.0.1 or the IP address of the machine. If you have trouble connecting to screen-scraper's proxy with your web browser, please see this FAQ.
Add a Quick On/Off Button to Toolbar
To simplify the whole process of turning the proxy server on and off, you can add a proxy button to a toolbar. One handy location is on the far right of the tab bar. To add the button,
- Right-click just about any of Opera's interface toolbars and select Customize....
You might need to select Appearance... explicitly before continuing.
- Click on the buttons tab.
- Select preferences to open its options.
- Drag and drop the Enable Proxy Servers button onto your toolbar.

Dragonfly
New to Opera 9.5.x is a feature called Dragonfly. You can access it by selecting Developer Tools from > Advanced, or alternately pressing control-shift-I. If you're familiar with Firefox's Firebug add-on, then you'll quickly recognize Dragonfly. It's built off of the same ideas, allowing you to manipulate CSS in realtime, seeing which properties are being overwritten by another. You can debug Javascript running on the page, find HTML elements on the page by clicking on them so that Dragonfly shows you the corresponding page source, see all final properties of elements, etc. It's a great tool for sifting through a website.